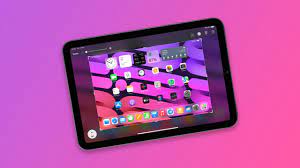
With the release of iPadOS 16 comes Stage Manager, one of the biggest new features in Apple’s latest tablet-centric operating system update — but not all iPad owners.
For those lucky enough to own a supported iPad, Stage Manager wants to reinvent iPad multitasking, bringing it closer to a traditional desktop experience, with resizable windows and multiple apps running side by side. Here’s how to use Stage Manager on iPad with iPadOS 16.1 and later.
How to activate stage management on iPad
While you might think that Stage Manager will be activated once you upgrade a supported iPad to iPadOS 16.1, that’s not actually the case. Instead, the feature is disabled by default, but can be easily enabled through the Settings app and Control Center.
Via the Settings app
1. Open the Settings app on your iPad.
2. Tap Home screen and Multitasking.
3. Click on Stage Manager (the option at the bottom of the list).
4. Open Use Stage Manager on the iPad.
If this is the first time you’ve enabled the Stage Manager feature, you’ll see a popup explaining briefly how it works.
From this section of the Settings menu, you can also hide Recent Apps and the iPad Dock, providing additional screen real estate for various app windows. To do this, simply uncheck “Recent Apps” or “Dock” from the “Stage Manager” layout section.
Via control center
If you prefer not to navigate the Settings app, you also have the option to activate Stage Manager on supported iPads through the Control Center:
1. Swipe down from the upper right corner of your iPad to access Control Center.
2. Click on the Stage Manager icon (the square with three small squares on the left) to activate.
As with the Settings app, you can also hide the Dock or recent apps from Control Center – just long-press the Stage Manager icon to access the options.
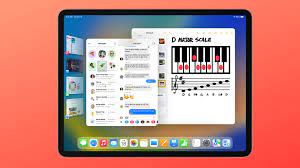
Resizing applications and moving windows in Stage Manager
A great feature of Stage Manager is the ability to resize and move your application windows on the fly, allowing you to create the perfect multi-application workspace.
To resize an application:
First press and hold the indicator displayed in the lower right corner of the application, then move your finger/cursor to resize the window.
The app’s layout should change according to the size and orientation you choose, so try out the various layouts available for your favorite apps.
Moving windows is easier: just tap and hold the top of an app window, then drag the app around on the screen.
Open multiple applications in the stage manager
Of course, the big draw of Stage Manager is the ability to use applications side-by-side, and it’s easy to do:
1. Open the first app you want to use.
2. Drag the second app you want to use from the Dock or from the Recent Apps section. You can do this a third time, but depending on the size of the iPad display you’re using, it might start to get a little cramped.
It’s worth noting that this method also works with multiple windows running the same application.
When multiple applications are open at the same time, they are automatically grouped. This means tapping the group from Recent Apps or the multitasking window will open all selected apps in the layout you were originally using.
How to Disable Stage Management on iPad
If you’ve decided you’ve had enough of Stage Manager and you just want to use Apple’s standard, perfectly functional split-screen multitasking, the quickest way to disable Stage Manager is via Control Center: swipe down from the top-right corner of the iPad display Swipe to access Control Center. Click on the Stage Manager icon so it is no longer highlighted/enabled. The stage manager technology should then be disabled, although it can easily be re-enabled at any point in the future via the same icon.
What about external monitor support?
In addition to being able to run applications in Windows like macOS, another great feature of Stage Manager is the ability to connect the iPad to an external display and use it independently of the iPad, just like a laptop or desktop. That’s a huge change, because until now, connecting an external display would only mirror what’s on the iPad.
Sadly, this feature is limited to the latest iPad Pro and iPad Air models with Apple’s M1 or M2 chipsets, and the experience isn’t available on older A-series iPad Pro models.
>>>>>>>>>>>>iPad battery